I am going to say something that might sound weird coming from someone who builds video software: most real estate video templates are a waste of your time.
Not all of them. But the majority of template-based video editors marketed to real estate agents produce output that looks exactly like what it is: a slideshow with transitions. Your listing photos slowly dissolve into each other over generic stock music, a text overlay announces the price and address, and the whole thing ends with your headshot floating in the corner. It is not bad, exactly. It is just forgettable. And in a market where buyers scroll past hundreds of listings per session, forgettable is the same as invisible.
The good news: the template category has evolved significantly since 2024. AI-powered video generation has changed what "template" means. Instead of dragging photos into timeline slots, modern tools analyze your images, generate camera motion, sync transitions to music beats, and render multiple format variants automatically. The result looks less like a PowerPoint presentation and more like actual videography. That is the kind of template worth your time.
This guide covers both approaches: traditional drag-and-drop templates and AI-powered generation. We will compare tools, break down pricing, show you what the output actually looks like, and give you a clear recommendation for your specific situation. If you have been thinking about adding video to your listings but do not have the budget for a videographer, this is where you start.
For the broader context on video marketing ROI, our How Reel-E Works guide covers the technical pipeline behind AI-generated listing videos.
What Real Estate Video Templates Actually Are (And What They Are Not)
Let me clear up a misconception first: "template" does not mean "cookie-cutter." At least, it should not. A well-designed template system gives you structure while allowing customization. Think of it like a listing presentation deck. The format is consistent, but the content is unique to every property.
There are three distinct categories of real estate video templates in 2026, and they produce wildly different results.
Category 1: Drag-and-Drop Slideshow Templates
These are the original "real estate video templates." Tools like Animoto, Canva, and Promo offer pre-designed video layouts where you drop in photos, edit text fields, choose music, and export. The template controls the visual style: fonts, colors, transition effects, text placement, and overall pacing.
What you get: A polished slideshow with professional typography and consistent formatting. Photos remain static within each slide. Transitions are preset (dissolve, slide, zoom, or wipe). The output looks clean and professional by PowerPoint standards.
What you do not get: Any illusion of camera movement. Each photo is flat and stationary. The transitions between photos do all the visual heavy lifting. There is no depth, no parallax, no sense that a camera is moving through the property. Viewers can tell immediately that they are watching arranged photos, not video footage.
Time investment: 15 to 30 minutes per video, including photo import, arrangement, text editing, music selection, and export.
Cost: Free (with watermarks) to $33/month for premium templates and features.
Category 2: AI Motion Templates
This is the category that changed everything. Tools like Reel-E, AutoReel, and Photoflow AI use depth estimation and neural rendering to generate realistic camera motion from still photos. The "template" here is not a visual layout you fill in. It is an automated pipeline that processes your photos, generates motion, syncs transitions to music, applies branding, and renders the final video.
What you get: Video that looks like a camera physically moved through each room. Orbit shots. Push-ins. Pull-outs. Lateral slides. The AI analyzes each photo's composition and chooses the motion type that looks most natural for that space. Transitions land on musical downbeats. Branding is rendered natively into the video, not pasted on top.
What you do not get: Granular editorial control. You cannot adjust individual clip durations down to the frame. You cannot manually keyframe a camera path. The AI makes the creative decisions. For 95% of listing videos, this is a feature, not a limitation. But if you are a control-oriented editor who wants to micromanage every transition, you might find it frustrating.
Time investment: 3 to 5 minutes of active work, plus 90 seconds to 3 minutes of processing time.
Cost: $39 to $599/month depending on tool and volume.
Category 3: Hybrid Templates (Edit + AI)
A newer category where tools combine AI motion with manual editing capabilities. You get the AI-generated camera motion but can also trim clips, reorder photos, adjust timing, and add custom text overlays. These tools try to serve both the "just make it fast" crowd and the "I want to tweak everything" crowd.
What you get: AI motion quality with editorial flexibility. You can regenerate motion for individual clips, swap out photos without redoing the whole video, and fine-tune the pacing.
What you do not get: Speed. The editing capabilities add complexity and time. What was a 3-minute process becomes 10 to 15 minutes. For agents who want maximum speed, the added control is not worth the time cost.
Time investment: 10 to 20 minutes per video.
Cost: $49 to $199/month.
Why Templates Beat DIY Editing (The Math Nobody Argues With)
Some agents insist on editing their own listing videos from scratch in iMovie, CapCut, or DaVinci Resolve. I respect the dedication. I also respect my plumber for not expecting me to fix my own pipes. There is a point where DIY stops being frugal and starts being foolish.
Here is the actual time and cost comparison for a 15-photo listing video:
| Method | Active Time | Wait Time | Monthly Cost | Cost per Video | Output Quality |
|---|---|---|---|---|---|
| DIY editing (iMovie) | 45 to 90 min | 5 to 10 min export | $0 | $0 (plus your time) | Low to Medium |
| DIY editing (Premiere Pro) | 30 to 60 min | 5 to 15 min export | $23/mo | $8 to $23 | Medium to High |
| Template slideshow (Animoto) | 15 to 30 min | 3 to 5 min export | $33/mo | $8 to $33 | Medium |
| AI motion (Reel-E) | 3 to 5 min | 90s to 3 min | $59 to $599/mo | $12 to $20 | High |
| Professional videographer | 0 min (outsourced) | 1 to 5 days | Per project | $300 to $1,200 | Highest |
If you value your time at $100/hour (a reasonable estimate for an agent closing $300K+ homes), that 45-minute iMovie session costs you $75 in opportunity cost. Add the lower output quality, and the "free" option is not actually free at all. Meanwhile, an AI tool costs $12 to $20 per listing and takes 5 minutes. That is not even a tradeoff worth debating.
The only scenario where DIY editing makes sense is if you genuinely enjoy video editing as a hobby. In that case, have at it. Just know that you are choosing a creative outlet, not a business optimization. For a comprehensive look at all the tools available, check our best real estate video makers comparison.
What to Look For in a Real Estate Video Template Tool
Not all template tools are created equal, and the feature lists on landing pages can be misleading. Here are the features that actually matter for real estate agents, ranked by impact on your workflow and output quality.
1. Multi-Format Output (Critical)
You need horizontal video (16:9) for MLS, Zillow, Realtor.com, and YouTube. You need vertical video (9:16) for Instagram Reels, TikTok, YouTube Shorts, and Facebook Stories. If your tool only renders one format per creation, you are doing double the work or skipping half your distribution channels. Neither is acceptable.
Some tools charge extra for each additional format. Others render one format and expect you to crop or letterbox it for other platforms (which looks terrible). The best tools render multiple formats from a single creation session. Reel-E renders four variants automatically: horizontal branded, horizontal unbranded, vertical branded, vertical unbranded. That covers every possible distribution channel from a single upload.
2. Music Sync Quality (High Impact)
This is the feature that separates "looks professional" from "looks auto-generated." When photo transitions land exactly on the downbeats of the music, the video feels intentional. When they land at random intervals, it feels like a tech demo wearing a suit.
Test this yourself: watch any well-produced TV commercial with the sound off, then with the sound on. Notice how every visual cut aligns with the audio rhythm. That synchronization is what makes content feel polished. It is also what most template tools completely ignore.
Basic template tools let you add music as a background audio track that plays independently of the visual transitions. There is no synchronization. The music and the visuals are strangers who happen to be in the same room. Beat-synced tools analyze the music's BPM (beats per minute) and time signature, then align every transition to fall on a downbeat. The difference is immediately noticeable, even to viewers who could not articulate why one video "feels" better than another.
3. Branding Controls (High Impact for Teams)
Your listing video should look like it came from you, not from a template. That means your logo, your contact information, your brand colors, and your headshot. Not a generic watermark in the corner. Actual branding that matches your listing presentations, your website, and your business cards.
The best template tools let you set up branding once and apply it automatically to every video. Upload your logo, add your contact card details, set your brand colors, and forget about it. Every listing video from that point forward carries your branding without any additional work.
For teams and brokerages, brand lock is essential. This lets a team leader set branding parameters that individual agents cannot override, ensuring every video maintains brand consistency regardless of who creates it.
4. Processing Speed (Moderate Impact)
When your photographer delivers listing photos at 2 PM and you want to go live on MLS by 4 PM, processing speed matters. Here is a rough benchmark for a 15-photo listing video:
- Under 3 minutes: Excellent. You can create the video, download it, and upload to MLS without it becoming a bottleneck in your workflow.
- 3 to 10 minutes: Acceptable. Start the render, answer an email, come back to a finished video.
- Over 10 minutes: Frustrating. Especially if you need to re-render because of a typo in the address or a wrong photo included.
Cloud-based processing on dedicated GPUs (like NVIDIA A100s) is consistently the fastest approach. Tools that render on your device are limited by your hardware and can take 15 to 30 minutes for a single video.
5. Photo Optimization (Moderate Impact)
Good template tools optimize your photos before processing. This includes resolution normalization (making sure all photos are at the same output resolution), aspect ratio correction (handling the inevitable mix of landscape and portrait shots in a set), and quality enhancement (sharpening, exposure balancing). Some tools reject photos below a minimum resolution threshold, which is annoying but ultimately protects you from bad output.
6. Output Resolution (Depends on Your Market)
1080p is the standard and is sufficient for MLS, social media, and most web uses. 4K matters if you are marketing luxury properties where buyers view on large screens or if you want your video to look sharp on 4K TVs at open houses. Not every agent needs 4K, but for agents selling $1M+ homes, it is a meaningful quality upgrade.
Template Tool Comparison: Feature by Feature
Here is an honest feature matrix for the tools real estate agents are actually using in 2026. I am including traditional template tools alongside AI-powered tools because many agents are still deciding between the two approaches.
| Feature | Canva (Free/Pro) | Animoto | Reel-E | AutoReel | Photoflow AI |
|---|---|---|---|---|---|
| Template type | Drag-and-drop | Drag-and-drop | AI motion | AI motion | AI motion |
| Camera motion | Ken Burns only | Ken Burns only | AI depth-aware | AI depth-aware | AI depth-aware |
| Beat-synced music | No | No | Yes | No | No |
| Multi-format output | Manual resize | Manual resize | 4 auto variants | 1 per render | 1 per render |
| Branding (logo + contact) | Manual placement | Basic overlay | Full auto branding | Text overlay | Premium only |
| Processing time (15 photos) | Manual + 5 min export | 15 min + 3 min export | 3 min + 90s render | 3 min + 2 min render | 3 min + 4 min render |
| 4K output | Pro plan | No | Pro plan | Premium | No |
| Entry price | Free / $13/mo | $33/mo | $59/mo | $29/video | $39/mo |
| Real estate specific | No | Templates available | Yes, purpose-built | Yes | Yes |
The table makes the tradeoffs clear. Traditional template tools are cheaper but produce static slideshows. AI tools cost more but produce output that looks like actual videography. For most agents, the quality jump from slideshow to AI motion is worth the price difference. You are spending money on marketing, and the quality of that marketing directly impacts how buyers perceive your listings.
For a deeper comparison of Reel-E against specific competitors, see our best Reel makers for real estate comparison.
What AI-Powered Templates Actually Look Like
Words only go so far. Here is a listing video created with Reel-E from 15 standard real estate photos. No videographer, no editing timeline, no export settings. Just photos uploaded, music selected, branding confirmed, and the AI handled everything else.
Notice the parallax on interior shots. The foreground elements (countertops, furniture edges) move faster than the background (walls, windows). That depth separation is what makes AI motion look like real camera footage rather than a flat photo slowly zooming in. That is the Ken Burns vs. AI motion difference in practice, and it is not subtle.
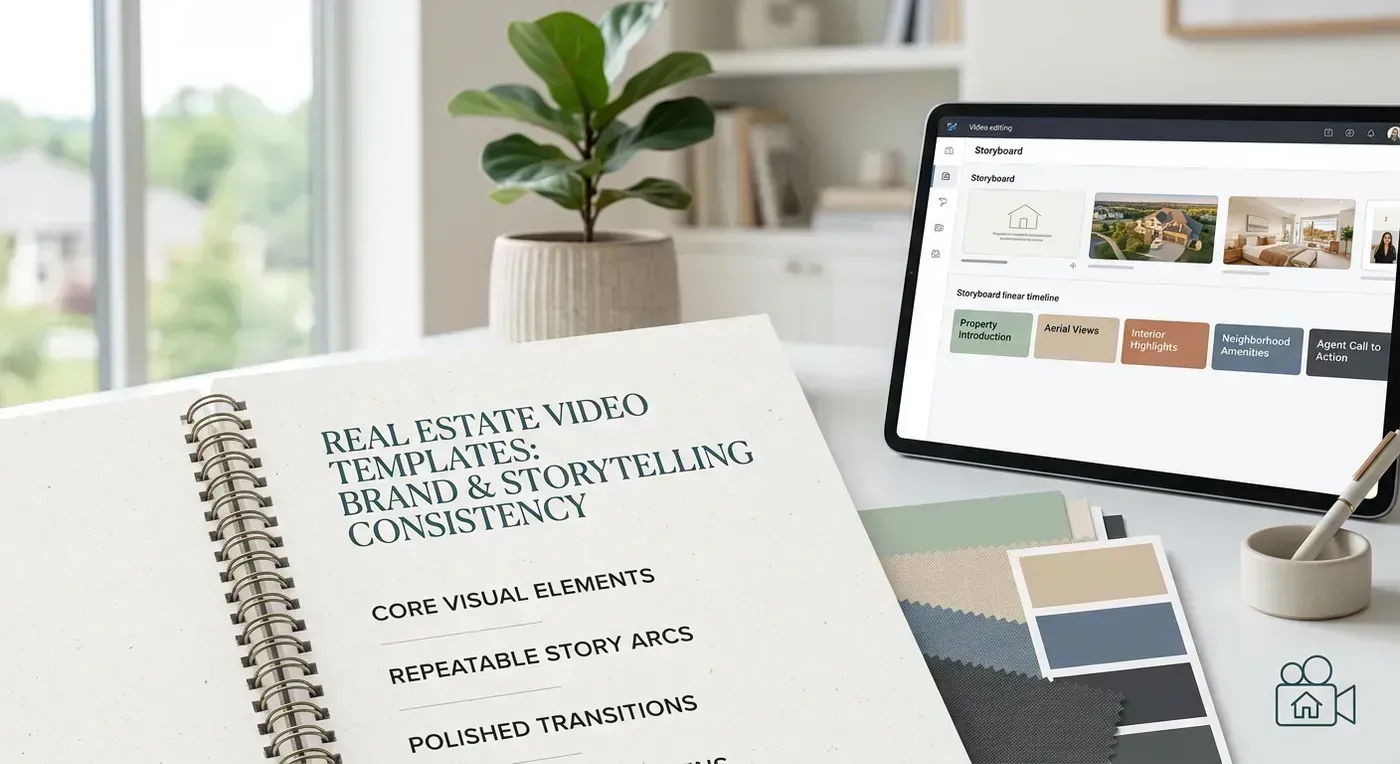
The Template Workflow: Step by Step
Let me walk through the actual workflow for creating a listing video with an AI template tool. This is the Reel-E workflow specifically, but the general steps are similar across AI tools.
Step 1: Property Details (1 minute)
Enter the property address, price, and key features. Some tools use this information for text overlays on the video. Others (like Reel-E) use it for the branding contact card that appears at the end.
Step 2: Music Selection (30 seconds)
Choose a track from the licensed music library. The library includes tracks analyzed for BPM and downbeat positions, which the AI uses to sync transitions. Pick a vibe that matches the property: upbeat and modern for a sleek downtown condo, warm and organic for a craftsman bungalow, cinematic and dramatic for a luxury estate.
This is where personal taste matters. I have noticed that agents who spend more than 60 seconds choosing music are overthinking it. The track sets a mood, and most options in a curated library will work. Pick one and move on.
Step 3: Photo Upload (1 to 2 minutes)
Upload your listing photos. The tool analyzes each image for resolution, composition, and scene type. Photos are automatically optimized and sequenced. Most tools let you reorder photos if you want a specific flow (exterior first, then interior rooms, ending with backyard or lifestyle shots).
A tip that improved my results significantly: lead with your strongest interior shot, not the exterior. The first photo becomes the first frame of the video, and a stunning kitchen or living room grabs attention faster than a front-of-house shot. Save the exterior for the closing sequence.
Step 4: Branding Confirmation (15 seconds)
If you have set up your branding (logo, contact card, colors), this step is just a confirmation click. Your branding carries over from video to video, so you only set it up once. New users spend 2 to 3 minutes on initial setup, then never touch it again.
Step 5: Generate (90 seconds to 3 minutes, hands-free)
Hit the create button and let the AI do its thing. The system processes each photo through the depth estimation and motion generation pipeline, assembles clips with beat-synced transitions, applies branding, and renders all output variants. You can close the tab and come back. The video will be waiting for you.
For the full technical breakdown of what happens during processing, see our How Reel-E Works guide.
Step 6: Download and Distribute (1 minute)
Download your variants and upload them where they need to go. Horizontal branded for your website and email campaigns. Horizontal unbranded for MLS (most boards require unbranded video). Vertical branded for Instagram Reels and TikTok. Vertical unbranded for the seller to share on their personal social media.
Total active time: about 4 minutes. Total output: 4 video variants covering every distribution channel. That is the kind of efficiency that changes how you think about listing marketing. Video goes from "special occasion" content to "standard operating procedure" for every listing.
Customization: How Much Control Do You Actually Need?
This is where honest self-assessment matters. I talk to agents every week who say they want "full control" over their listing videos. When I ask what they would change, the answer is almost always one of three things: photo order, music choice, or branding. They do not actually want to keyframe camera paths or adjust transition timing down to the millisecond. They want the video to look professional, match their brand, and be ready fast.
If that describes you, an AI-powered template tool is the right fit. You control the inputs (photos, music, branding) and the AI handles the execution (motion, timing, rendering). The output is consistent, professional, and fast.
If you genuinely want frame-level editorial control (and you are willing to invest the time), a hybrid tool or traditional video editor is the right fit. Just be honest with yourself about whether you will actually use those controls or whether they will sit there unused while you spend 10x longer creating each video.
Templates for Different Property Types
Not every property needs the same video treatment. Here is how to adjust your template approach based on what you are listing.
Standard Residential ($200K to $800K)
This is the template sweet spot. Upload 12 to 18 photos, select an upbeat or warm track, let the AI handle the rest. These listings benefit enormously from video because buyers in this price range are scrolling through dozens (sometimes hundreds) of listings. Video stops the scroll. It makes your listing memorable in a sea of photo carousels.
Recommended approach: AI template tool, 20 to 30 second output, distributed to MLS + Instagram + Facebook.
Luxury Properties ($1M+)
Luxury listings benefit from video that feels premium. Slower pacing. Cinematic music. More photos (20 to 25) to showcase architectural details and lifestyle features. Consider 4K output if the tool offers it. The buyers at this price point often view content on large screens and appreciate the quality difference.
For properties over $2M, AI templates are best used as supplemental content alongside professional videography. The AI-generated video serves as a quick social media teaser while the videographer delivers the cinematic walkthrough with drone footage.
Recommended approach: AI template tool (4K if available) for social media and rapid MLS listing. Professional videographer for the premium property website and luxury portals.
Rentals and Investment Properties
Rental properties almost never justify a professional videographer's fee. But they absolutely benefit from video. Tenants searching for apartments engage with video listings significantly more than photo-only listings, and landlords/property managers who offer video tours reduce vacancy days.
Keep it simple: 8 to 12 photos, upbeat music, 15 to 20 seconds. The goal is to give prospective tenants a sense of the space and layout, not to create an art film. An AI template tool at $59/month covering 3 rental listings is a fraction of even one day of vacancy cost.
Recommended approach: AI template tool, short format, focus on layout and natural light.
New Construction
New construction presents a unique challenge for template-based video: the property might not exist yet, or it might exist in various stages of completion. For pre-construction marketing, use rendered architectural visuals (if available) or photos of model homes with the same floor plan. For under-construction properties, progress update videos can be compelling content, but they work better as phone-filmed walkthroughs than as template videos.
Once the home is complete, the standard AI template workflow applies. Upload the finished listing photos and generate the video as you would for any other property.
Platform-Specific Template Considerations
Where you distribute the video determines what format you need. Here is the quick reference.
| Platform | Aspect Ratio | Max Length | Format | Notes |
|---|---|---|---|---|
| MLS (most boards) | 16:9 | 5 min | MP4 or YouTube link | Many require unbranded |
| Zillow / Realtor.com | 16:9 | 10 min | YouTube link embed | Branded OK |
| Instagram Reels | 9:16 | 90 sec | MP4 | 15 to 30 sec performs best |
| TikTok | 9:16 | 10 min | MP4 | Under 60 sec recommended |
| YouTube | 16:9 | 15 min | MP4 | 1 to 3 min ideal for SEO |
| 16:9 or 9:16 | 240 min | MP4 | Square 1:1 also works | |
| Email campaigns | 16:9 | N/A (thumbnail link) | GIF preview or link | Link to hosted video |
This is why multi-format output matters so much. If your tool only renders 16:9 horizontal, you are either skipping Instagram and TikTok (where the fastest-growing audiences are) or uploading letterboxed horizontal video to vertical platforms (which looks amateurish and gets crushed by the algorithm).
Common Template Mistakes (And How to Avoid Them)
After watching thousands of agent-created listing videos, I have assembled a greatest-hits collection of mistakes. Learn from other people's pain.
Mistake 1: Too Many Photos
More photos does not equal a better video. A 30-photo video at 3 seconds per clip is 90 seconds long. That is an eternity on social media. Nobody is watching a 90-second slideshow of a $350K ranch home. Buyers will bail after 15 seconds unless every frame is stunning. Curate ruthlessly. 12 to 18 photos is the sweet spot. Show the best rooms, skip the second guest bathroom and the utility closet.
Mistake 2: Wrong Photo Order
The first photo in your video is the first impression. Starting with the garage or a hallway is like opening a listing presentation with the termite inspection report. Lead with impact. Your best interior shot (usually the kitchen or primary living space) should be first. Exterior and lifestyle shots work well at the end.
Mistake 3: Generic Music
That acoustic guitar track that sounds like it belongs in a coffee shop commercial? Every other agent is using it too. Pick music that matches the property's personality. A modern, upbeat track for a contemporary townhouse. A warm, organic arrangement for a colonial. Something cinematic and spacious for a luxury listing. The music sets the emotional tone for the entire viewing experience.
Mistake 4: No Branding (Or Too Much Branding)
A listing video without your branding is a missed opportunity. Someone shares it, and nobody knows who listed the property. But a video with your giant headshot watermarked across every frame is equally bad. The sweet spot is a clean branded outro (logo + contact card for the last 4 to 6 seconds) and a small logo in the corner during the property footage. Prominent enough to identify you, subtle enough not to distract from the listing.
Mistake 5: Ignoring Vertical Format
If you are only creating horizontal (16:9) listing videos, you are ignoring the platforms where your content has the highest organic reach. Instagram Reels and TikTok are vertical-first platforms. Posting a horizontal video with black bars on a vertical platform is the visual equivalent of showing up to a black-tie event in cargo shorts. It tells the algorithm (and the viewer) that you did not put in the effort to format properly.
Pricing Deep Dive: What Are You Really Paying For?
Template tool pricing is designed to be confusing. Here is what you are actually paying for at each price tier.
Free Tier ($0/month)
What you get: Basic slideshow creation with limited templates, watermarked output, generic music library, 1080p max, one format per export.
Who it is for: Agents testing whether video makes a difference before committing budget. It does make a difference, so you will upgrade within a month.
Entry Tier ($29 to $59/month)
What you get: AI-generated camera motion, licensed music, basic branding, 1080p output, 3 to 5 listings per month.
Who it is for: Solo agents with 2 to 5 listings per month. At Reel-E's Essential plan ($59/month for 3 listings), the cost per listing is about $20. That is less than a tank of gas to drive to the property for a showing.
Growth Tier ($99 to $199/month)
What you get: Everything in entry tier plus higher volume caps (10+ listings/month), multi-format output, advanced branding, priority processing.
Who it is for: Active agents and small teams with 5 to 15 listings per month. Reel-E's Growth plan ($129/month for 10 listings) works out to $13 per listing. At this volume, you are spending less on video for all your listings combined than a single videographer visit would cost for one property.
Pro/Enterprise Tier ($299 to $599+/month)
What you get: High volume (25 to 50+ listings/month), 4K output, priority GPU processing, team management, API access.
Who it is for: Brokerages, teams, and high-volume agents. Reel-E's Pro plan ($599/month for 50 listings) brings the per-listing cost down to $12. At this scale, you are producing studio-quality video content for the price of a coffee run. For a full rundown of how different tools approach pricing, see our real estate video marketing tools guide.
Templates and SEO: A Hidden Benefit
Here is something most agents do not think about: listing videos improve your search visibility. YouTube is the world's second-largest search engine. When you upload a listing video to YouTube with proper titles, descriptions, and tags (the property address, neighborhood, city, and key features), that video can appear in Google search results for those terms.
A buyer searching "homes for sale in Westlake Hills Austin" might see your YouTube listing video right in the Google results. That is free, organic traffic to your listing. No ad spend required. The video template just needs to look professional enough that the buyer clicks through rather than scrolling past.
MLS video also gets indexed by aggregator sites. Zillow, Realtor.com, and Redfin all surface video-enhanced listings more prominently in their search results and recommendations. Having video does not guarantee top placement, but not having video guarantees you are at a disadvantage compared to agents who do.
Getting Started: Your First Listing Video in Under 5 Minutes
You have read the comparisons. You understand the features. Now stop reading and go make a video. Seriously. The single biggest barrier to agents using video is not cost, not technology, and not skill. It is inertia. The "I'll set it up next week" that becomes next month, then next quarter, then never.
Here is what to do right now:
- Gather photos. Pull up the listing photos from your most recent (or upcoming) listing. If you do not have a current listing, use photos from your last sale. This is practice, not perfection.
- Pick a tool. If you want the fastest path from photos to finished video, start a free trial with Reel-E. If you want to test with a free tool first, open Canva and use a real estate video template. Either way, start today.
- Upload and create. Follow the steps outlined above. It will take less time than reading this section took.
- Distribute. Post the vertical version to Instagram Reels. Upload the horizontal version to YouTube. Share it in your next email newsletter. Tag the property address.
- Measure. After a week, check engagement. Compare views, saves, and inquiries against your typical listing post. The data will speak for itself.
The agents who are winning listing presentations in 2026 are not the ones with the biggest ad budgets or the flashiest websites. They are the ones who show sellers a portfolio of professional listing videos and say, "This is what your home will look like within 24 hours of our photographer's visit." That is a differentiator. Templates make it possible for every agent, not just the ones with videography budgets.
Your listing photos are already sitting in a folder doing nothing. Five minutes from now, they could be a professional video playing on Instagram, YouTube, and your MLS. Try it now and see the difference for yourself.